
How to Create a Cast Shadow
by Trish
by Trish
Here we have the background plate and the extracted subject that we
need to apply a shadow
to. Without the shadow, there is no visual clue as to the scale and
position of the object. The shadow also serves to anchor the object to its surface.
Step 1
The first thing that we are going to do, is to create a standard drop
shadow.
Choose the Layer style button at the bottom of the Layers panel (looks
like a little “f”)
Select Drop Shadow.
Use the settings as shown below (change angle according to light
source)
Step 2
We now have a pretty good drop shadow, but we want a cast
shadow.
We are going to separate the layer style from the layer, so that we
have the shadow by itself on it's layer
In the Layers panel,
right click on the little “fx” on the right of the layer name.

You will see a drop down
menu. Choose the option called Create Layer

The layer will now be spilt into 2 layers. The shadow will be moved to
its own layer directly underneath the original as shown.
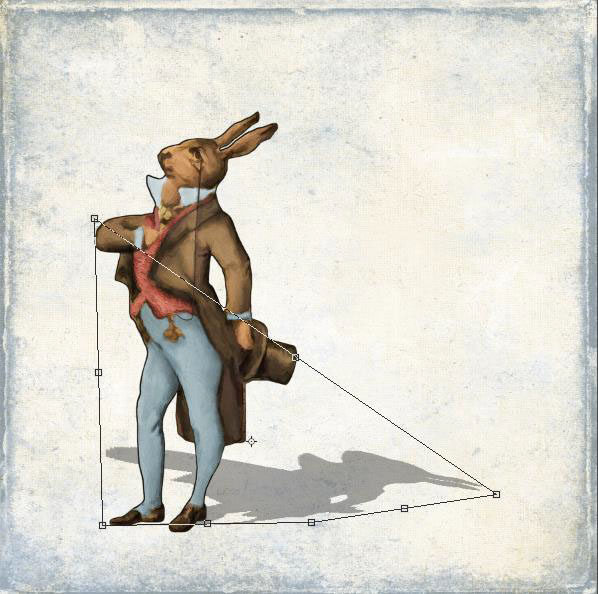
| Step 3. |

Now to distort the shape.
On the new layer, press Ctrl/Cmd+T, this will bring up the free
transform tool. Right click on the selected object, select “Distort” from the pop-up menu
You will see a bounding box with 8 little squares. Click and drag the
top right square (called handles) until it looks similar to the picture.
Step 4
Click and drag on the left top handle to match the angle on our model.
Reposition any of the handles if you need to.
Press Enter/Return to apply the transformation.
You now have a basic cast shadow.
You can also reduce the opacity and add color to suit the background